Working with Riptide
Now you have everything set up! It is time to access your project through Riptide.
This part of the guide will show you how to do daily tasks with Riptide.
Access your projects web services
First make sure that the proxy server is started. After that head to the URL you configured for the proxy. You should be greeted with a landing page:
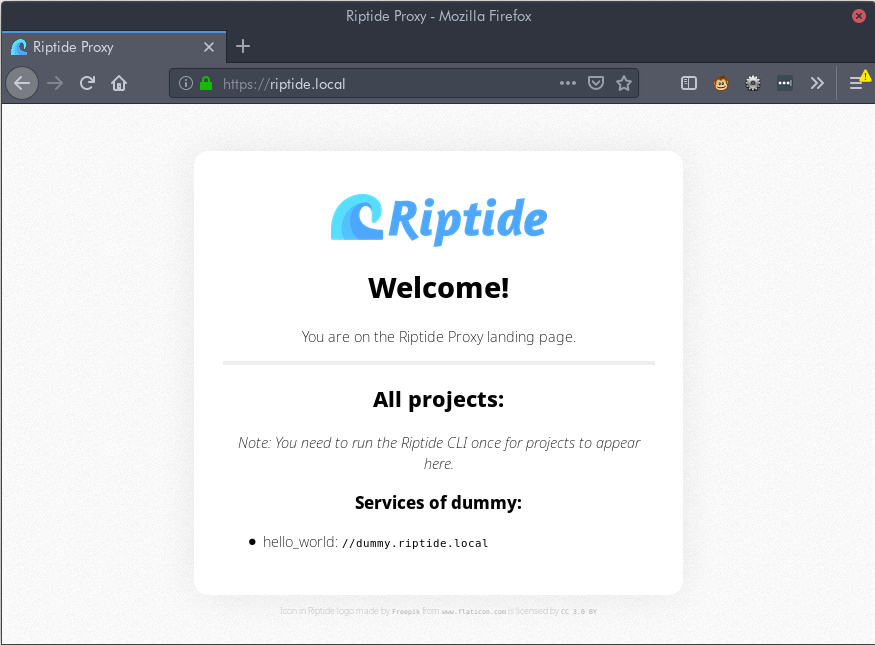
As you can see, projects with all services that have HTTP capabilities are listed here. You can click on a link to access the service.
All service URLs have the following structure:
<project>(--<service>).<proxy-url>
If your service is configured to be the main service of the URL, it’s url is simply
the URL of the project (eg. dummy.riptide.local). If your project has multiple
services, than the other services are accessible by adding two dashes to the
name of the project (eg. dummy--service2.riptide.local).
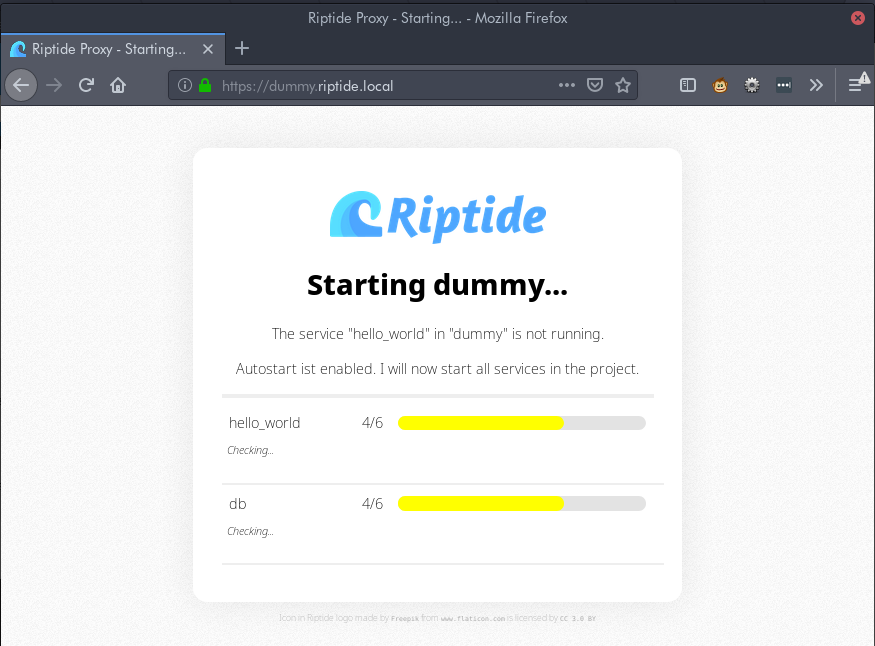
Accessing the dummy project’s hello_wold service as shown in the screenshot above, will present you with the autostart page of this web service:
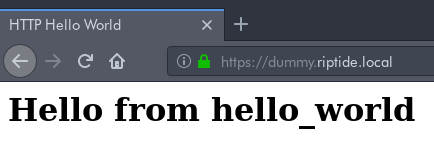
After your project has started up, you will see the contents served by your web service:
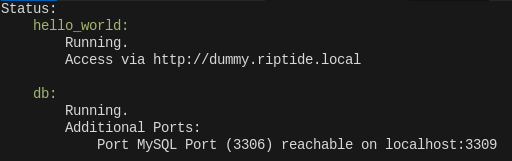
Access other TCP/UDP ports
A project may provide other, non HTTP services. Riptide allows services to define additional ports which will be bound to your local machine on a port that will always stay the same.
For example, if you have two projects, both with a MySQL server that would normally run on port 3306, then the first project may reserve the port 3306 and the second one 3307. The ports will always stay the same for these projects so you can configure your SQL software accordingly.
To view the additional ports for a project, run riptide status after the services
have been started:
Running CLI commands
Note
This section assumes you have the Shell Integration set up.
If not, prefix all commands with riptide cmd.
A project may define helpful shell commands for you to use.
To list them run riptide cmd:
$ riptide cmd
  Commands:
      - mysql
To run a command, simply execute it on the shell (you need to be inside the project directory):
$ mysql --help
mysql: [Warning] Using a password on the command line interface can be insecure.
mysql  Ver 8.0.15 for Linux on x86_64 (MySQL Community Server - GPL)
...
Warning
When using the shell integration and you have just set up a project, you need to leave and re-enter the project to use commands.
Warning
Piping (|, <, >) is not supported for Riptide commands.
If you need to pipe input, you may be able to run the command directly
in the shell of a service.
Warning
The --help flag does not work as expected when running commands with
riptide cmd, it will always show the help for
riptide cmd instead. Please set up the shell integration if you need
the --help flag.
Starting and stopping services via CLI
You can start and stop services on the CLI by using the start, restart
and stop commands. You can pass the -s flag to only affect certain services
(comma separated):
$ riptide stop -s hello_world,db
Stopping services...

hello_world: 2/3|██████████████████████████████████▋                 | Stopping...
db         : 3/3|████████████████████████████████████████████████████| Stopped!
To view the names and status of all services run riptide status.
Running services in foreground
Sometimes you might need to run a command in foreground mode (attached to your console; interactively) like you would run other commands. This may be needed if you want to debug the service. For example when using NodeJS you can configure this with the debugger of your IDE to start and stop your application service via the IDE and have it attach it’s debugger.
To run a service in foreground use start-fg. In this example a service named varnish is run in foreground:
$ riptide start-fg -s www varnish
(1/3) Starting other services...
Starting services...

www: 2/2|██████████████████████████████████████████| Already started!

(2/3) Stopping varnish...
Stopping services...

varnish: 3/3|██████████████████████████████████████| Stopped!

(3/3) Starting in varnish foreground mode...
bind(): Cannot assign requested address
child (37) Started
Child (37) said Child starts
Please note that some service options are ignored when running a service interactively:
- The logging options for stdout and stderr are ignored. Instead stdout and stderr are directly sent to the terminal.
pre_startandpost_startcommands are not run.- The
srcrole is added to the service. This means that the source code of your application will always be available for the service. working_directoryis ignored. The working directory is set to the directory you are currently in. If you are not currently inside the project, the working directory is set to the root of the project.
A note about paths and directories
Please note that all containers used to run your application use a separate file system from your own.
The path configured in the src setting inside the riptide.yml is available for all services with the src role and all commands under /src.
If you see paths in logs and other places /src always represents the project src setting.
You CAN NOT access files on your machine that are outside of the src directory.
Under normal circumstances, this will be no problem. When you start commands and are inside the project src-folder you can access files like normal,
because Riptide will automatically run the command in the correct directory inside the container.
However you can not use any paths that are outside the project’s ``src`` directory.
Let’s take the following example: We have a directory tree like so:
/home/me/my_projects
 -> project
    -> riptide.yml
    -> a_file
-> other_directory
    -> b_file
The src setting is set to ., meaning that all commands and services have the entire /home/me/my_projects directory mounted to /src.
Because of this, the following will work as expected. my_command will be able to access a_file:
$ pwd
/home/me/my_projects/project
$ riptide cmd my_command a_file
$ riptide cmd my_command ./a_file
$ riptide cmd my_command /src/a_file
However the following will NOT work. my_command will find neither a_file nor b_file:
$ pwd
/home/me/my_projects/project
$ riptide cmd my_command /home/me/my_projects/project/a_file
$ riptide cmd my_command ../other_directory/b_file
$ riptide cmd my_command /home/me/my_projects/other_directory/b_file
Directly access the shell of a service
This should usually not be required, but you can directly access the shell of the
containers the services run in by running riptide exec service_name.
If you need root access inside of the container, pass the flag --root.